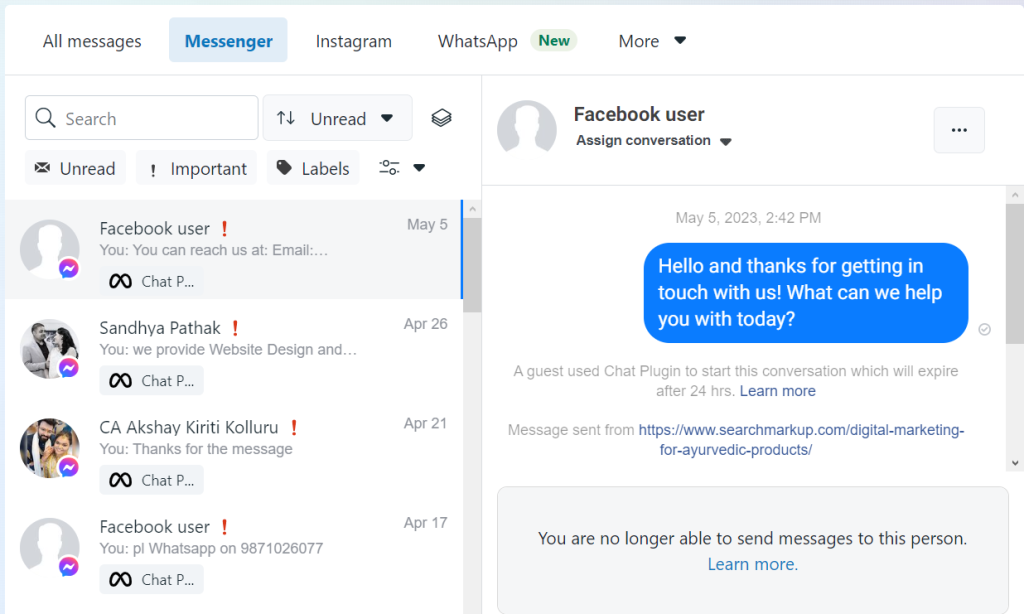
Facebook Messenger is a widely used messaging platform that allows businesses to connect and communicate with their customers directly. Auto-reply is an essential feature of Facebook Messenger that enables businesses to send automated responses to customer inquiries, ensuring timely and efficient communication.
This feature is particularly helpful for businesses that receive a high volume of messages or are unable to respond immediately due to time zone differences or other factors. By using auto-reply, businesses can improve customer satisfaction, increase engagement, and maintain a professional image.
Benefits of Using Auto-Reply on Facebook Messenger
- Improved customer service: Auto-reply ensures that customers receive a response even when your team is unavailable, thus providing a better overall experience.
- Increased efficiency: By automating responses to common inquiries, your team can focus on more complex tasks and save valuable time.
- Higher engagement: Timely responses to customer inquiries can lead to higher engagement rates, as users are more likely to continue interacting with your business.
- 24/7 availability: Auto-reply allows your business to be available around the clock, providing support to customers in different time zones.
- Consistent brand voice: Crafting well-written auto-replies ensures that your brand voice remains consistent across all customer interactions.
Setting Up a Facebook Page
Before you can utilize the auto-reply feature on Facebook Messenger, you must first create and set up a Facebook Business Page. This page serves as your business’s online presence on the platform and allows you to connect with potential customers, share updates, and gather valuable insights.
Creating a Business Page
To create a Facebook Business Page, follow these steps:
- Log in to your Facebook account.
- Click on the “Create” button in the top right corner of the main menu, and then select “Page.”
- Choose the appropriate category for your business (e.g., “Local Business or Place,” “Company, Organization or Institution,” etc.).
- Fill out the required information, such as your business name, address, and contact details.
- Add a profile picture and cover photo that represent your brand.
- Complete the “About” section by providing a brief description of your business, including its mission, products/services, and target audience.
- Click “Create Page” to finish the process.
Customizing Your Page for Better Engagement
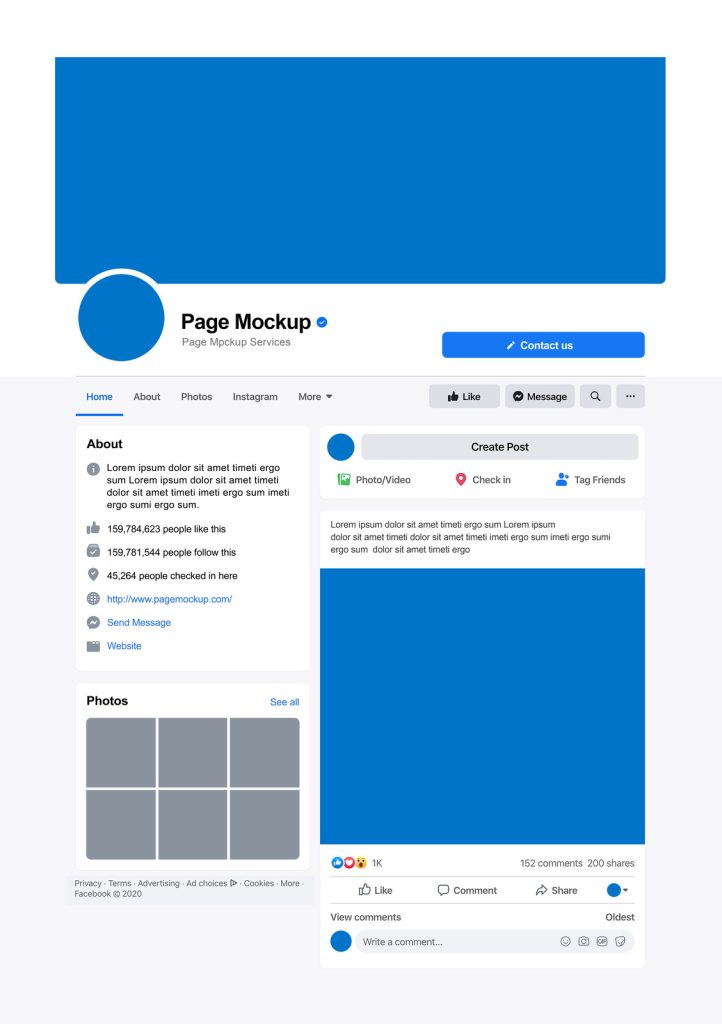
After creating your Facebook Business Page, it’s crucial to optimize it for better engagement and visibility. Here are some tips for customizing your page:
- Choose an appropriate username: Your username should be easy to remember and representative of your brand. It will also be used as the URL for your page (e.g., facebook.com/YourBusinessName).
- Add a call-to-action (CTA) button: Facebook allows you to add a CTA button to your page, such as “Shop Now,” “Contact Us,” or “Learn More.” This button can direct users to your website, online store, or contact information.
- Utilize the “Services” or “Shop” tab: If you offer products or services, consider adding a “Services” or “Shop” tab to your page. This allows users to browse and purchase items directly from your Facebook Page.
- Post engaging content regularly: Share updates, promotions, and behind-the-scenes content to keep your audience engaged and informed. Use a mix of text, images, videos, and links to provide variety and maintain interest.
- Interact with your followers: Respond to comments, messages, and reviews to show that you value your customer’s opinions and are available to address their concerns.
Connecting Facebook Messenger to Your Page
Once you’ve set up your Facebook Business Page, the next step is to connect Facebook Messenger to your page. This will enable you to communicate with customers directly and utilize auto-reply features to engage with them efficiently.
Enabling the Messenger Platform
To enable Facebook Messenger for your business page, follow these steps:
- Go to your Facebook Business Page and click on “Settings” in the top right corner.
- In the left sidebar, click on “Advanced Messaging.”
- Under the “Messenger Platform” section, find the “Subscribed Apps” area and ensure that “Messenger” is listed as a subscribed app. If it’s not, click on “Add Messenger” to enable it.
- Review the other settings under “Advanced Messaging,” such as “Response Time Display” and “Appointment Messaging,” and configure them according to your preferences.
Customizing Messenger Settings
After enabling Facebook Messenger for your page, you should customize its settings to enhance the user experience and align with your brand. Here are some essential settings to consider:
- Greeting Text: This is the first message users see when they open a conversation with your page in Messenger. Customize this message to greet customers warmly and encourage them to interact with your business.
- Instant Replies: You can set up instant replies for users who message your page for the first time. This feature can be used to thank customers for reaching out, provide additional contact information, or inform them of your typical response time.
- Away Messages: If your business has specific hours of operation or periods when you’re unavailable, set up away messages to inform customers that you’ll respond as soon as possible.
To customize these settings, follow these steps:
- Go to your Facebook Business Page and click on “Settings” in the top right corner.
- In the left sidebar, click on “Messaging.”
- Scroll down to find the “Greeting Text,” “Instant Replies,” and “Away Messages” sections.
- Click “Edit” for each section and customize your messages accordingly.
- Save your changes by clicking “Save” or toggling the switch to “On.”
A step-by-step infographic on enabling and customizing Facebook Messenger for a business page.
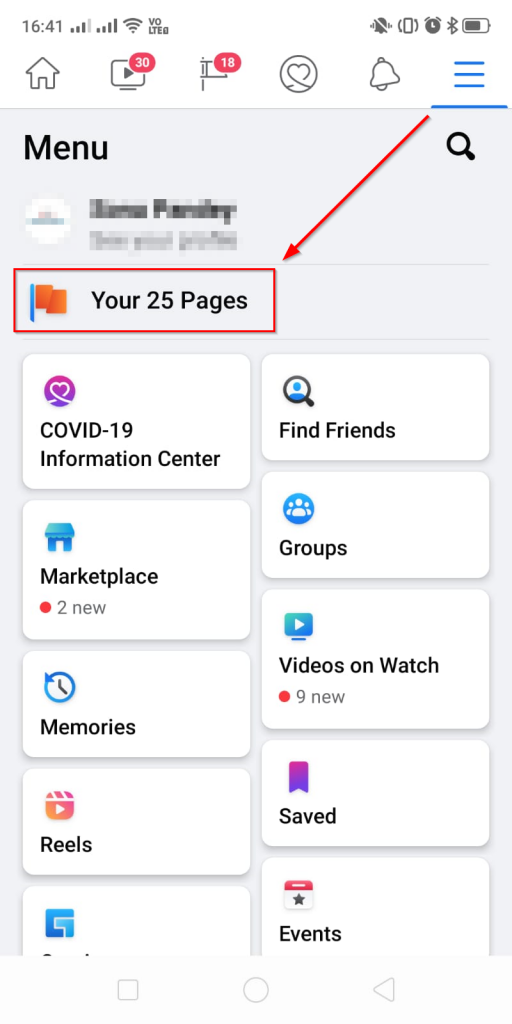
- Select your Facebook page and open it to setup auto-reply
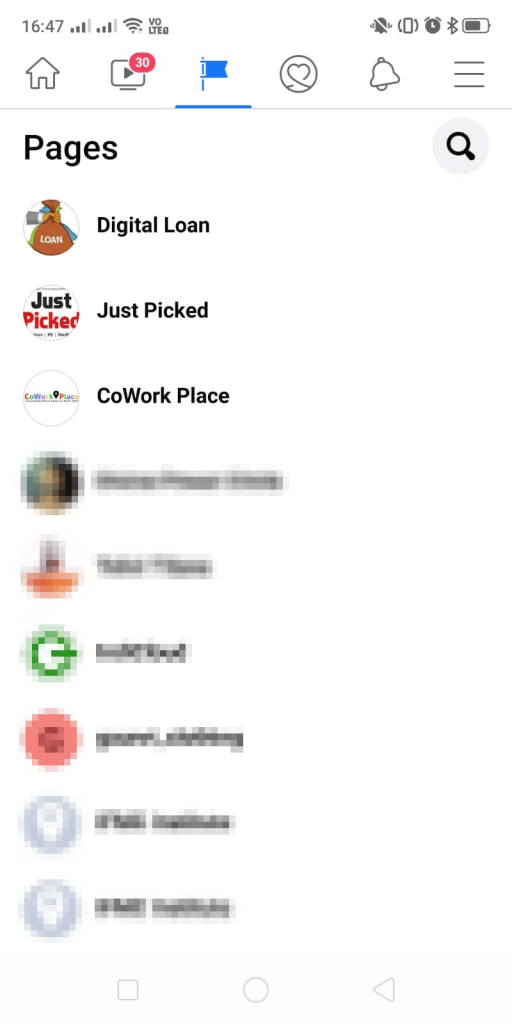
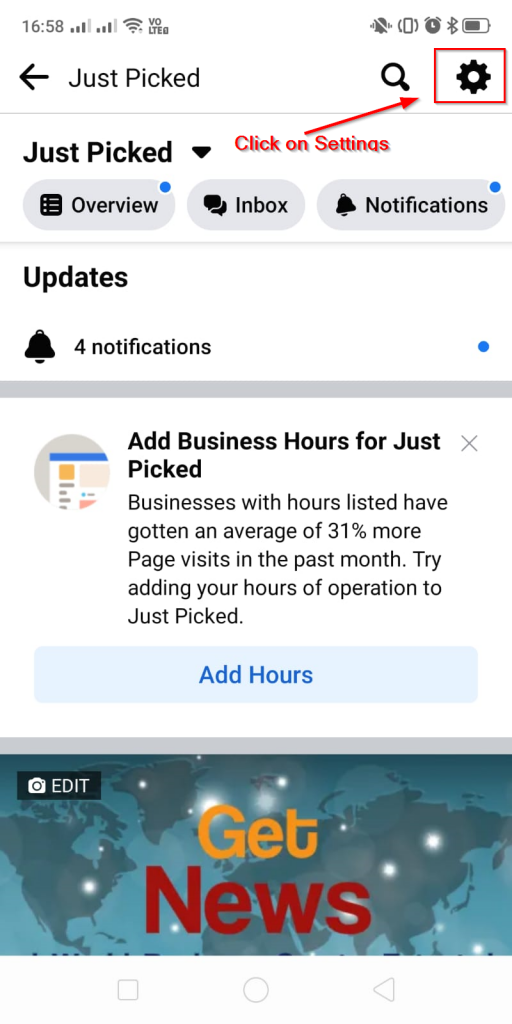
- So in my case I have selected one of my page name Just Picked, Now click on settings as indicated in the screen-shot below.
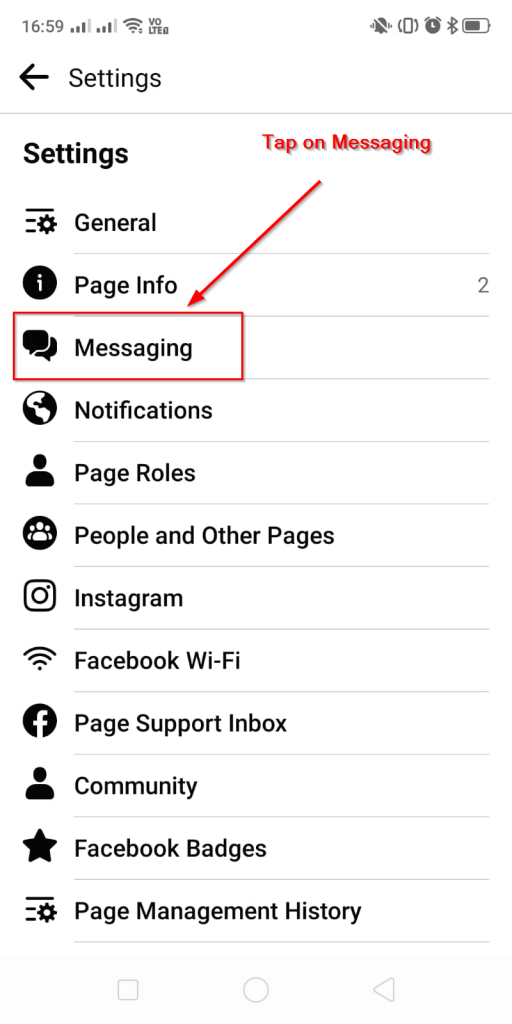
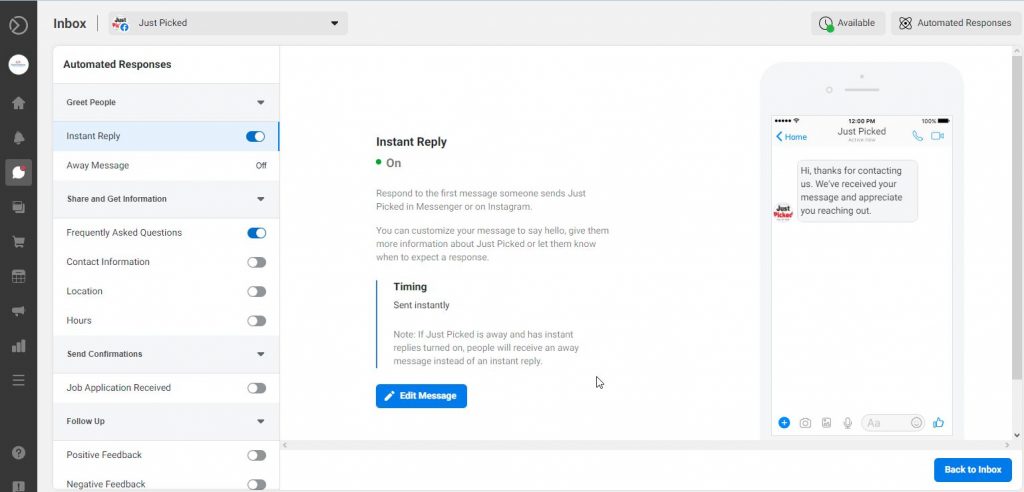
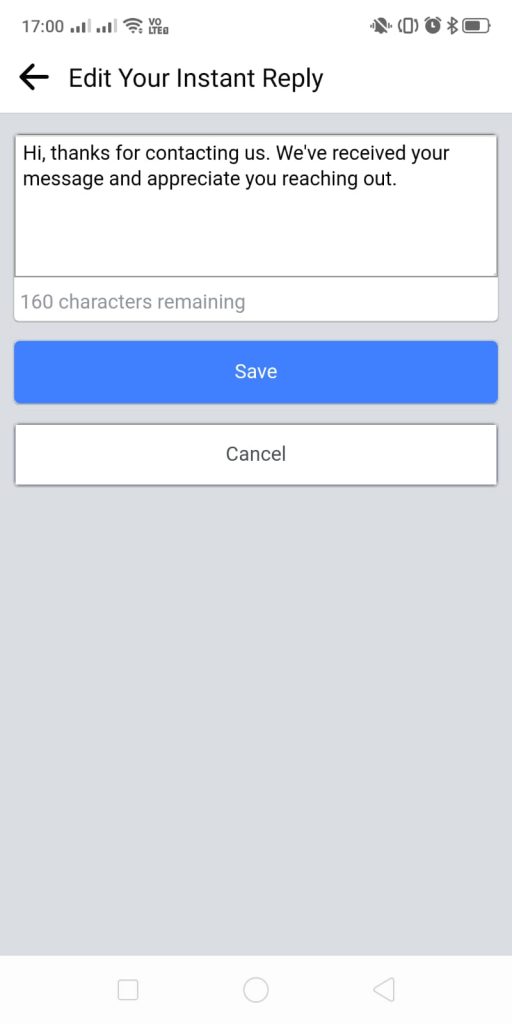
- On a desktop, Facebook takes you to the business.facebook.com https://business.facebook.com/latest/inbox/automated_responses click on edit message to setup Instant Reply, and don’t forget to toggle switch on the Instant reply, after you edit your message hit save, and done.
- On this page, scroll down and click edit below “auto-reply.” You should get a box that says “your message here” followed by two blank lines of space. Start typing your response message here.
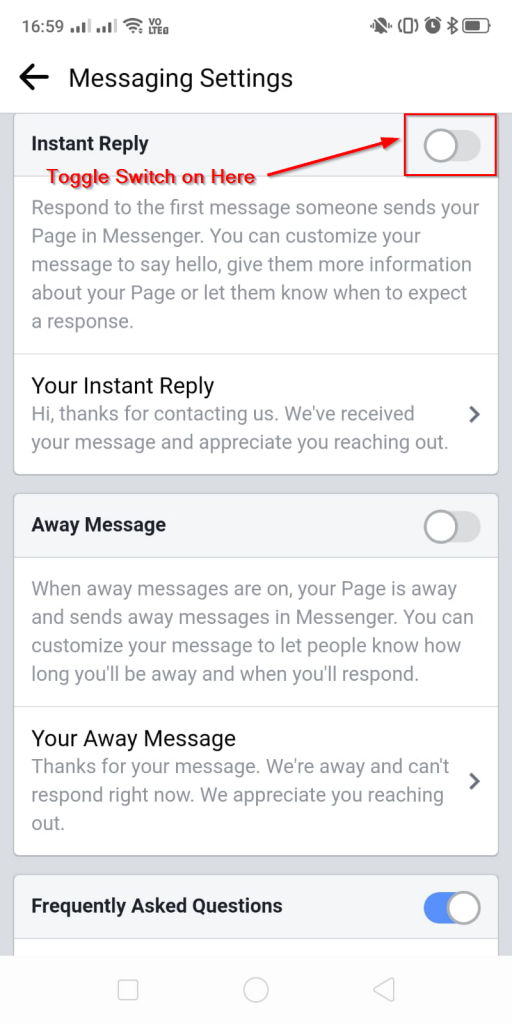
- Now hit save changes when you’re done! This will send messages to the person directly to the person interact with your business pages on Facebook instead of showing up as pending notifications in the Facebook Messenger app or on their computer screen.
Choosing an Auto-Reply Tool
To set up an auto-reply on Facebook Messenger, you have two main options: using Facebook’s native auto-reply feature or utilizing third-party tools. Each option has its advantages and drawbacks, so it’s essential to choose the one that best suits your business needs.
Native Facebook Auto-Reply Feature
Facebook offers a built-in auto-reply feature called “Instant Replies,” which allows you to send automated responses to users who message your page for the first time. This feature is easy to set up and free to use, making it an excellent option for small businesses or those with limited resources.
Pros:
- Free and easy to use
- Integrated directly within Facebook
- No need for additional software or integrations
Cons:
- Limited customization options
- Lacks advanced features such as message sequences, targeting, and analytics
Third-Party Auto-Reply Tools
Several third-party tools can help you create more sophisticated auto-reply systems on Facebook Messenger. These tools offer advanced features, such as message sequencing, targeting, and analytics, allowing you to create highly customized and engaging auto-reply experiences for your users.
Some popular third-party auto-reply tools include:
- ManyChat
- MobileMonkey
- Chatfuel
- Tars
Pros:
- Advanced features for creating customized auto-reply sequences
- Better targeting and personalization options
- In-depth analytics for monitoring performance and optimizing your strategy
Cons:
- May require a subscription or payment for certain features
- Can be more complex to set up and manage
- Requires integration with your Facebook Business Page
When choosing between the native Facebook auto-reply feature and third-party tools, consider factors such as your budget, required features, and the level of customization you need for your auto-reply system.
Setting Up Auto-Reply Using Facebook’s Native Feature
If you choose to use Facebook’s native auto-reply feature, follow these steps to set up “Instant Replies” for your business page:
Accessing the Auto-Reply Settings
- Go to your Facebook Business Page and click on “Settings” in the top right corner.
- In the left sidebar, click on “Messaging.”
- Scroll down to find the “Instant Replies” section.
Crafting Your Auto-Reply Message
- Toggle the switch next to “Instant Replies” to turn it on.
- In the “Your Reply” box, write a message that will be sent automatically to users who message your page for the first time. Keep it concise, informative, and welcoming.
- You may include details about your products/services, typical response times, or links to FAQs.
- Use personalization tokens like “{{user_first_name}}” to address users by their first name, making the message feel more personal.
- Customize the message format using the available formatting options, such as bold, italics, and bullet points.
Configuring Auto-Reply Timing and Frequency
- In the “When to Send” section, choose when you want to send instant replies:
- Always: Sends an instant reply every time a user messages your page for the first time, regardless of your business hours.
- Custom Schedule: Allows you to set specific days and times when instant replies will be sent. This is useful if you want to align auto-replies with your business hours or availability.
- Save your changes by clicking “Save.”
Once you’ve configured your instant reply settings, Facebook will automatically send your auto-reply message to users who message your page for the first time. However, note that this feature is limited to first-time interactions and lacks advanced customization options available in third-party tools.
Setting Up Auto-Reply Using Third-Party Tools
If you prefer to use a third-party tool for setting up an auto-reply on Facebook Messenger, follow these general steps. Keep in mind that the specific process may vary depending on the tool you choose.
Selecting the Right Tool for Your Needs
Before setting up an auto-reply, research and select a third-party tool that aligns with your business needs and budget. Consider factors such as ease of use, features, pricing, and integration capabilities. Popular options include ManyChat, MobileMonkey, Chatfuel, and Tars.
Integrating the Tool with Facebook Messenger
Once you’ve chosen a third-party tool, follow these general steps to integrate it with your Facebook Business Page:
- Sign up for an account with the selected tool.
- Follow the onboarding process, which usually involves connecting your Facebook Business Page to the tool.
- Grant the necessary permissions to allow the tool to access and manage your Facebook Messenger conversations.
Note: The exact steps and interface may vary depending on the tool you choose.
Crafting and Configuring Your Auto-Reply Messages
After integrating the third-party tool with Facebook Messenger, you can start creating and configuring your auto-reply messages. Most tools offer advanced features such as message sequences, targeting, and analytics, allowing for highly customized user experiences.
- Set up a “Welcome Message” or “Main Menu” that serves as the starting point for users interacting with your Messenger bot. This message should greet users and provide options for them to choose from (e.g., FAQs, product categories, contact information).
- Create auto-reply sequences for various scenarios, such as answering frequently asked questions, providing information about your products/services, or promoting special offers.
- Use personalization features to address users by their name or other known information.
- Incorporate images, videos, or other media to make your auto-replies more engaging.
- Configure targeting and segmentation options to ensure that users receive relevant auto-replies based on their behavior, preferences, or demographics (if available).
- Set up triggers for auto-reply messages, such as keywords in user messages, specific actions taken by users, or time-based triggers.
Monitoring and Optimizing Your Auto-Reply System
After setting up your auto-reply system, it’s essential to monitor its performance and make adjustments as needed. This ensures that your auto-replies remain effective, engaging, and relevant to your audience.
Analyzing Performance Metrics
Most third-party auto-reply tools provide analytics and reporting features that allow you to track the performance of your Messenger bot. Key metrics to monitor include:
- Open rates: The percentage of users who open your auto-reply messages. High open rates indicate that your messages are engaging and relevant.
- Click-through rates (CTR): The percentage of users who click on links or buttons within your auto-reply messages. High CTRs suggest that your calls-to-action are compelling and that users are interested in the content you’re providing.
- Conversion rates: The percentage of users who complete a desired action (e.g., making a purchase, signing up for a newsletter) after interacting with your auto-reply messages. High conversion rates indicate that your auto-replies effectively guide users towards your business goals.
- User feedback: Monitor user reactions, comments, and messages to gather qualitative insights into the effectiveness of your auto-reply system. This feedback can help you identify areas for improvement or uncover new opportunities for engagement.
Making Data-Driven Adjustments
Based on your analysis of performance metrics, make data-driven adjustments to your auto-reply system to optimize its effectiveness. Some potential adjustments include:
- Refining message content: Update your auto-reply messages to address user feedback, incorporate new information, or improve clarity and relevance.
- Adjusting targeting and segmentation: Modify your targeting and segmentation settings to ensure that users receive the most appropriate auto-replies based on their behavior, preferences, or demographics.
- Testing different approaches: Experiment with different message formats, styles, or calls-to-action to determine which approaches resonate best with your audience. Use A/B testing or other experimentation techniques to compare different variants and identify the most effective strategies.
- Expanding your auto-reply system: As your business grows and evolves, consider adding new auto-reply sequences to address emerging customer needs, promote new products/services, or engage users in different ways.
By continually monitoring and optimizing your auto-reply system, you can ensure that it remains an effective tool for engaging customers, providing support, and driving business results.
Adhering to Facebook Messenger Policies
When setting up an auto-reply on Facebook Messenger, it’s crucial to adhere to Facebook’s policies and guidelines. This ensures that your business remains compliant, avoids potential penalties or restrictions, and creates a positive experience for your users.
Understanding Facebook Messenger Policies
Facebook has specific rules and best practices for using its Messenger platform, including:
- Transparency: Clearly communicate the purpose of your Messenger bot and provide users with information on how to manage their communication preferences.
- Consent: Obtain user consent before sending subscription messages, promotional content, or other types of communications that require opt-in.
- Data privacy: Handle user data responsibly and in accordance with Facebook’s data policies and applicable privacy laws (e.g., GDPR).
- Content restrictions: Ensure that your auto-reply messages do not contain prohibited content, such as hate speech, misinformation, or spam.
For a complete understanding of Facebook Messenger policies, review the Facebook Messenger Platform Policies and Community Standards.
Implementing Best Practices
To ensure compliance with Facebook Messenger policies and create a positive user experience, consider implementing these best practices:
- Provide clear opt-out options: Make it easy for users to unsubscribe from your Messenger bot or manage their communication preferences. This can include adding a “Manage Preferences” or “Unsubscribe” button within your auto-reply messages.
- Avoid excessive messaging: Limit the frequency of your auto-reply messages to avoid overwhelming or annoying users. Focus on providing valuable, relevant content rather than sending too many messages.
- Personalize your messages: Use personalization features to tailor your auto-reply messages to individual users, making them more relevant and engaging.
- Monitor user feedback: Regularly review user reactions, comments, and messages to identify any issues or concerns with your auto-reply system. Respond promptly to user feedback and make adjustments as needed.
By adhering to Facebook Messenger policies and implementing best practices, you can ensure that your auto-reply system remains compliant and provides a positive, engaging experience for your users.
Continuously Improving Your Auto-Reply Strategy
An effective auto-reply strategy requires continuous improvement to adapt to changing user needs, business goals, and platform features. By regularly evaluating your auto-reply system and making data-driven adjustments, you can ensure that it remains a valuable tool for engaging customers and driving results.
Keeping Up with Platform Updates
Stay informed about updates to Facebook Messenger and third-party tools to take advantage of new features, improvements, and best practices. Subscribe to newsletters or follow blogs from Facebook or your chosen auto-reply tool to stay up-to-date on the latest developments and recommendations.
Revisiting Your Business Goals
As your business evolves, your goals and priorities may change. Regularly revisit your auto-reply strategy to ensure that it aligns with your current business objectives and supports your desired outcomes. For example, you may need to update your auto-reply sequences to promote new products or services, address emerging customer needs, or support new marketing campaigns.
Collecting and Incorporating User Feedback
User feedback is an invaluable resource for improving your auto-reply system. Encourage users to provide feedback on their experience with your Messenger bot and actively monitor their reactions, comments, and messages. Use this feedback to identify areas for improvement, uncover new opportunities for engagement, or validate the effectiveness of your auto-reply messages.
Experimenting and Testing New Approaches
Continuously improve your auto-reply strategy by experimenting with different message formats, styles, or calls-to-action. Use A/B testing or other experimentation techniques to compare different variants and identify the most effective strategies. By regularly testing new approaches, you can optimize your auto-reply system and ensure that it remains engaging and relevant to your users.
Collaborating with Your Team
Involve your team in the process of improving your auto-reply strategy. Encourage team members to share their ideas, feedback, and insights to help identify new opportunities for engagement or areas for improvement. Collaborative brainstorming can lead to innovative solutions and help ensure that your auto-reply system aligns with your overall business strategy.
By continuously improving your auto-reply strategy, you can adapt to changing user needs, take advantage of new platform features, and drive better results for your business.
Conclusion
Implementing an effective auto-reply system on Facebook Messenger can significantly improve your customer engagement, support, and overall communication strategy. By following the steps outlined in this guide and adhering to best practices, you can create a powerful auto-reply system that drives results for your business.
In conclusion, remember these key takeaways:
- Understand the benefits: Auto-reply systems can help streamline customer support, increase engagement, and drive conversions by providing timely, relevant, and personalized responses to users.
- Choose the right tool: Decide between using Facebook’s native auto-reply feature or a third-party tool based on your budget, required features, and desired level of customization.
- Craft engaging messages: Create auto-reply messages that are concise, informative, and welcoming, incorporating personalization features and multimedia elements when appropriate.
- Monitor and optimize: Regularly analyze performance metrics, collect user feedback, and make data-driven adjustments to improve your auto-reply system’s effectiveness.
- Adhere to Facebook Messenger policies: Ensure compliance with Facebook’s rules and guidelines to avoid penalties or restrictions and create a positive user experience.
By continuously improving your auto-reply strategy, staying up-to-date with platform updates, and involving your team in the process, you can maximize the potential of Facebook Messenger as a powerful communication tool for your business.


